CPR and Automated External Defibrillators (Infant to age 1)
CPR (cardiopulmonary resuscitation) is used when a baby isn’t breathing. It's also used when a baby is gasping for breath or their heart has stopped beating. CPR starts with chest compressions. It's followed by rescue breathing. The chest compressions and rescue breathing are done in cycles. CPR does the work of the heart and lungs.
Take an infant CPR class to learn how to respond to an emergency. The class will teach you the right way to do CPR. You can take a class online or in person through the American Heart Association or the American Red Cross.
The information below gives you the basics of infant CPR. It's not intended to take the place of CPR training.
Getting started
Babies and children are more likely to have cardiac arrest because of a lung or airway problem instead of a heart problem, as in adults. Because of this, rescue breathing should always be performed in babies and children, combined with chest compressions, if possible.
An automated electronic defibrillator (AED) is a medical device that checks the heart rhythm of a person who has collapsed or is unconscious. If needed, the AED delivers an electric shock to get the heart beating again. AEDs are often found in public places. You may find AEDs in daycare centers, schools, offices, airports, and shopping malls.
How to do CPR and use an AED
Make sure the area is safe before you start these steps.
Step 1. Check if your baby can respond
-
Shout to get the baby's attention, using the baby's name. If the baby does not respond, tap the bottom of the baby's foot and shout again.
-
If the baby responds, stay with them. Call 911. Keep your baby comfortable and warm until emergency rescuers arrive.
If your baby does not respond, is not breathing, or is gasping for breath, do the following:
-
If someone is with you, have them call 911 right away. They should also try to find an AED. In the meantime, begin chest compressions and rescue breathing (steps 2 and 3) right away.
-
If you’re alone, and did not witness the child collapse, first start chest compressions and rescue breathing (steps 2 and 3). Continue for 2 minutes. Then call 911 and check to see if an AED is immediately available.
-
If no AED is available, resume chest compressions and rescue breathing.
-
If an AED is available, use it, and follow the instructions for resuming chest compressions and rescue breathing.
-
If another helper arrives, have them assist by calling 911 and/or obtaining an AED, if not already done.
-
If you're alone and saw the child collapse, call 911 right away and use an AED if it is readily available. (See Step 4 below.) Follow the instructions of the AED to perform chest compressions and rescue breathing. If no AED is readily available, start chest compressions and rescue breathing immediately after calling 911 .
-
If another helper arrives, have them assist by calling 911 and obtaining an AED, if not already done.
Step 2. Begin chest compressions
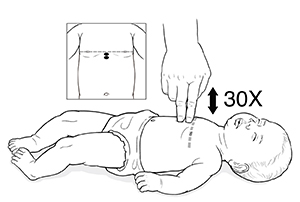 |
| Chest compressions. |

-
Lay your baby on their back on a firm surface.
-
Stand or kneel to the side of the baby, with your hips at a slight angle.
-
Methods for chest compressions on a baby:
-
Place 2 fingers on the baby’s breastbone just below an imaginary line that runs between the nipples. Use your 2 fingers to compress the baby’s chest. Press down to at least 1/3 the depth of the baby’s chest. This is about 1-1/2 inches in depth. This method is preferred for 1-person CPR .
-
Use both thumbs to do compressions. Do this by placing your thumbs side by side on the center of the baby's chest just below the nipple line. Your fingers will encircle the baby's chest so that they support the baby's back. Press down to at least 1/3 the depth of the baby’s chest. This is about 1-1/2 inches in depth. This method is preferred for 2-person CPR.
-
Note: If you can’t reach the depth of 1 ½ inches using the compression methods above, consider using the one-hand method. To do this, place the heel of one hand in the center of the child’s chest. Push down to a depth of 1-1/2 inches.
-
Allow the baby’s chest to come back up fully after each compression. This gives the heart time to refill with blood.
-
If you are alone, do 30 compressions. If you have another person with you who can give rescue breaths, do 15 compressions. Press down hard and fast. You should be doing these at a rate of at least 100 to 120 compressions per minute.
-
If you’re trained in CPR and can do rescue breaths, now is the time to do them (see step 3).
-
If you don't know how to give rescue breaths, keep doing compressions until the baby shows obvious signs of life movement, the AED is ready (see step 4), emergency rescuers take over, or you are unable to continue due to safety or fatigue.
Step 3. Begin rescue breathing
 |
| Rescue breaths. |
-
Put 1 hand on the baby’s forehead. With your other hand, put 2 fingers under the baby’s chin and gently tilt the head upward. Don’t tilt the head too far back.
-
If the baby doesn’t start breathing right away, place your mouth over the baby’s open mouth and nose. Give one gentle rescue breath, lasting 1 second (in your mind, count “one one-thousand”).
-
Check if your baby’s chest rises:
-
If the chest rises, air has gone into the lungs. Let the baby exhale.
-
If the baby’s chest does not rise, air has not gone into the baby’s lungs. The airway may be blocked. Tilt the baby’s head again. Check if there’s something in the baby’s mouth. If you can see an object, use your little finger to sweep it out. Never do a blind sweep of the mouth if you don't see an object. This may push the object further down the airway.
-
Give 1 more rescue breath.
-
If the baby’s chest still does not rise, start chest compressions again.
-
If you are alone, continue with the cycle of 30 compressions and 2 rescue breaths. Check for signs of life every 2 minutes.
-
If you are doing 2-person CPR, continue the cycle of 15 compressions and 2 rescue breaths. Check for signs of life every 2 minutes. Switch roles from compressions to rescue breathing every 2 minutes to help prevent fatigue.
-
Continue CPR until you see obvious signs of life, an AED or help arrives, or you are unable to continue due to safety or fatigue.
Step 4. Using the AED
-
Make sure you are in a dry area. If not, move the baby to a dry area with a firm surface.
-
Remove the baby’s clothing from their upper body. If needed, dry the baby's chest.
-
Turn on the AED. Listen to and follow the instructions:
-
Put the pads on the baby’s chest. Follow the pictures on the instructions that come with the AED. Use the small pads meant for infants. If they are not available, use the adult pads. When using the adult pads, make sure the pads don’t touch each other. If it looks like the pads will touch, put 1 pad in the center of the baby’s chest. Put the other pad on the center of the baby’s upper back. You may need to first dry the baby’s back.
-
Follow the AED's instructions to not touch the baby when it is checking the baby's heart rhythm.
-
The AED will deliver a shock if needed. Some AEDs will tell you to press a button to deliver the shock.
-
Don't touch the baby while the AED delivers a shock.
-
Start chest compressions and rescue breathing again (steps 2 and 3). Don't remove the chest pads even if the baby wakes up. The pads cannot be re-used once they are removed. Keep them on in case another emergency arises. The AED will continue to check the baby’s heart rhythm.
-
If the baby responds and begins breathing, stay with them. Keep the baby comfortable and warm until help arrives.
-
If the baby does not respond, continue CPR with the instructions from the AED until help arrives.
Online Medical Reviewer:
Liora C Adler MD
Online Medical Reviewer:
Marianne Fraser MSN RN
Online Medical Reviewer:
Ronald Karlin MD
Date Last Reviewed:
5/1/2024
© 2000-2025 The StayWell Company, LLC. All rights reserved. This information is not intended as a substitute for professional medical care. Always follow your healthcare professional's instructions.